0

Getting started with ElasticSearch on Node

“Searching,
Seek and Destroy
Searching,
Seek and Destroy” – Metallica

I recently had to set up ElasticSearch within a Node project.  I found the supporting documentation to be scattered and had a difficult time finding examples of what I would consider everyday production configurations.  So I’ve gathered a lot of what I learned here and hopefully this saves some of you a bit of time.

Get the elasticsearch-js client

First, use the elasticsearch-js npm package.  This seems to be actively developed.  Specifically, do not use the elasticsearchclient package as that seems to be end-of-lifed.  Create your client like:

ElasticSearch = require("elasticsearch")
client = new ElasticSearch.Client {host: 'localhost:9200'}

Create the index

Next, you’ll want to create your indices.  This is where it can get overwhelming.  ElasticSearch is great because it can be configured in countless ways, but understanding all the variants can be hard at the beginning.  Here is what I think would be a great place to start.  Using your ES client, create an index ‘users’:

client.indices.create
  index: "users"
   type: "user"
   body:
     settings:
       analysis:
        filter:
          mynGram:
             type: "nGram"
             min_gram: 2
             max_gram: 12
          analyzer:
             default_index:
               type: "custom"
               tokenizer: "standard"
               filter: [
                 "lowercase"
              ]
             ngram_indexer:
               type: "custom"
               tokenizer: "standard"
               filter: [
                "lowercase"
                "mynGram"
              ]
             default_search:
              type: "custom"
              tokenizer: "lowercase"
              filter: [
                "standard"
              ]
     mappings:
       dynamic: "true"
       properties:
         id:
           type: "string"
           index: "not_analyzed"
         name:
          type: "string"
          index_analyzer: "ngram_indexer"
         suggest:
           type: "completion"
           index_analyzer: "simple"
           search_analyzer: "simple"
           payloads : true

Here we have:

  • defined the default index and search analyzers (default_index, default_search).  These will be used to index all fields unless otherwise specified, such as in…
  • mappings.properties.name.  Here we want to use an ngram tokenizer on the user’s name so we can do fun things like search within names so searching on ‘ike’ would return Mike and Ike.
  • defined a completion suggester index in mappings.properties.suggest

Test the setup

That’s the bare bones getting started.  To test out what your indexer is doing, you can simply run a query, specify the indexer you want to test out, and you’ll get a list of all the tokens that are being generated from that indexer.

localhost:9200/users/_analyze?pretty&analyzer=ngram_indexer&text=Michael
0

Toupe on the App Store

I am excited to announce the release of the Toupe app on the App Store.

Toupe is a simple utility that gives you more control over how much you pay for electricity.  It does this in two ways: by showing you the current price of electricity in your area, and letting you compare prices across all the service plans your utility offers.

Current Price
Learn when electricity is cheapest (typically at night) and when the best times are to run your appliances or other electricity hungry machinery.  If you charge an electric vehicle at home, you will definitely want to try Toupe as you can immediately start seeing significant savings.

Pricing screen

Pricing screen

Compare Prices

Also, Toupe shows you what other service plans your utility company offers, and the current price on those plans.  Similar to how your telephone company offers different levels of service to best suit your needs, most utility companies offer several service plans.  Toupe lets you compare prices across all the service plans.

Compare service plans

Compare service plans


Free to Download
The app is free to download on the App Store.  Toupe has pricing for nearly all utilities in the U.S.  Put in your zip code, select your utility and you’re set to go.

Toupe is powered by Genability’s extensive electricity pricing data.  If you are interested in integrating real time electricity pricing, bill calculation and lots more into your application, check out Genability’s APIs.  They’ve got a rock solid API and are constantly extending it.

0

Popping modals all night in iOS

Poppin bottles in the ice, like a blizzard
When we drink we do it right, gettin’ slizard
Sippin sizzurp in my ride, like Three 6
Now I’m feelin so fly like a G6
Like a G6, Like a G6
Now I’m feelin so fly like a G6

I recently discovered a personal knowledge gap in using Scroll Views, Navigation Controllers and modal windows to cleanly work together. Here’s a brief description:

Picture a deck of cards spread out in one long row of 52 cards, edged right up next to each other.  Picture your phone being able to show only one card at a time.  The user uses a modal view to select the next card to display.  When the card is selected, the modal is dismissed and that card is displayed.

Brief recap:

  • 9 hearts is displayed
  • you use modal view to select 3 spades
  • 3 spades is displayed

(Really brief ScrollView primer)  In iOS land, the phone screen is the ScrollView’s current frame, and the position of the cards are matched with the ScrollView’s current offset.  Imagine the ScrollView’s frame glides, or scrolls, across all 52 cards in either direction in an instant.

The problem I discovered happened when I was dismissing a modal view.  The presenter of the modal dismisses it and then messages its parent to scroll away from it and display the 3 spades.  What would happen is the scroll would display that section but those pages or ‘cards’ had not yet been built.  The offset was being set before the content was created.  For whatever reason, the ViewWillAppear method did not seem to be called for the newly selected card views.

This was difficult to debug because it wasn’t a simple error message I could search for, but more required a deeper understanding of the platform.  And it turns out the solution is quite elegant.

The dismissViewControllerAnimated call has a completion block parameter.  Perfect.  Put the messaging to the parent after we have dismissed the modal.

- (void)selectCard:(NSString *)cardNumber {
    [self dismissViewControllerAnimated:YES completion:^{
        [[self delegate] displayCard:cardNumber];
    }];
}

Worked like a charm.

0

Screen scraping with SpookyJS

“Then I felt just like a fiend,
It wasn’t even close to Halloween.”
Geto Boys

I needed to build a screen scraper for a Node.js application and spent a good deal of time making it all work. I wanted to share some lessons learned that I would have found very helpful to have known at the outset.

This post is about getting PhantomJS, CasperJS and SpookyJS playing nicely and understanding what role each one plays.

High Level – how it all works

PhantomJS does all the grunt work of scraping the screen. But to do anything remotely interesting, like logging in, clicking around, it quickly becomes cumbersome. That’s where CasperJS comes in. It sits on top of PhantomJS and lets you easily do things like logging in, following links etc. My scraper interacted solely with CasperJS, and it handled talking to PhantomJS.

PhantomJS and CasperJS are native processes running on the local server. As such, they can not be directly accessed via a Node.JS app, at least not without a lot of work.

That’s where SpookyJS comes in. SpookyJS is an npm module that lets you work with CasperJS directly from within your Node app. How it does this is beyond this post but it’s worth a read. It basically spins up a CasperJS process and talks to it via JSON/RPC calls. Neat stuff.

Know Thy Contexts! There are 3 of them

If I can pass on any knowledge in this post, it is this section. Know thy three contexts:

  • Node/SpookyJS context
  • CasperJS context
  • Page context

SpookyJS has a good write up on how to pass variables from one to the other. Examples always help me understand so let’s write one.

// In the Node app, where we require(‘spooky’) and all that

var spooky = new Spooky({
  casper: {
    //configure casperjs here
  }
}, function (err) {
  // NODE CONTEXT
  console.log('We are in the Node context');
  spooky.start('http://www.mysite.com/');
  spooky.then(function() {
    // CASPERJS CONTEXT
    console.log('We are in the CasperJS context');
    this.emit('console', 'We can also emit events here.');
    this.click('a#somelink');
  });
  spooky.then(function() {
    // CASPERJS CONTEXT
    var size = this.evaluate(function() {
    // PAGE CONTEXT
    console.log('....'); // DOES NOT GET PRINTED OUT
    __utils__.echo('We are in the Page context'); // Gets printed out
    this.capture('screenshot.png');
    var $selectsize = $('select#myselectlist option').size();
      return $selectsize;
    })
  })

CasperJS has a very convenient utils module it injects into each page. When you are in an Evaluate function, you are essentially on the page itself and that’s where you can use JQuery and the utils module. Using console.log is pointless as the output does not get captured by your application.

Quick Note: Insert JQuery

I don’t know why CasperJS didn’t just include JQuery. So much easier than trying to learn their own selector definitions. Add it when you set up the casper options.

var spooky = new Spooky({
 casper: {
   logLevel: 'error',
   verbose: false,
   options: {
     clientScripts: ['../public/javascripts/jquery.min.js']
   }
 }
 ...

Setting up SpookyJS

I’ll assume you know how to add the SpookyJS npm package to your app. Once you’ve done that, it’s time to start scraping! Here’s where I spent a lot of time.

Before you get too far, I would *strongly* encourage you to understand how CasperJS works. They have a good explanation of it on their docs, especially the section on the ‘evaluate’ method. This was my ‘aha’ moment.

The general flow of a SpookyJS app is you chain together several spooky.then steps. Each one of these is run once the previous one is completed. Anything added between a spooky.then step is run immediately without waiting for the previous step to complete.

spooky.then(function() {
 this.wait(5000, function() {
   this.emit('console', 'step 1');
 })
}
console.log('step 2');
spooky.then(function() {
 this.wait(5000, function() {
  this.emit('console', 'step 3');
 })
}
// prints out
step 2
step 1
step 3

Getting Slightly Fancier

Say we want to click a link, and then download a file from the resulting page. Let’s say that the link has an id of #account, and on the resulting page, the file to download is a link with id #downloadfile and we want to download it to /tmp/file.pdf

spooky.then(function() {
 this.click('a#account');
});
// This next step will not start until the page is loaded
spooky.then(function() {
 this.download(this.getElementAttribute('a#downloadfile','href'), '/tmp/file.pdf');
});

Getting Even Fancier

Now let’s say we have a drop down list of 12 months. Selecting a month refreshes the page and we want to take a screenshot of each of the 12 months.

** Using globals. To pass variables within then() functions, you can take advantage of global variables, attaching them to the window object. See this in the example below.

//Not showing the set up and config. Find that above.
spooky.start('http://www.pge.com/');
 spooky.then(function(){
  window.numMonths = this.evaluate(function() {
   var $selectsize = $('select#month_select option').size();
   return $selectsize; // returns 12, the number of months
  });
 });

 spooky.then(function() {
  var casperCount = 0;
  this.repeat(window.numMonths, function() {
   this.evaluate(function(i) {
    $('select#month_select').get(0).selectedIndex = i;
    // Refresh the page using one of the two ways below
    $('#month_selection_form').submit(); // If the select is within a form
    $('select#month_select').change(); // If the page has a trigger on the select
    return true;
   },{ i: casperCount });

   this.then(function() {
    this.capture('month' + casperCount + '.png');
    casperCount = casperCount + 1;
   });
  });
});

Hope That Helps

It took me a while to get all the contexts sorted out but once you understand how each piece plays together nicely with the others, SpookyJS with CasperJS can be very powerful. Add the npm cron package and then you’ve got a first class scraping application.
Happy scraping!

0

iOS – Updating application state from a UITableViewCell

One of my current clients is a new restaurant where they want an iOS app from which their customers can order their food.  One of the requirements is allowing the user to select 0-n number of dishes for multiple dishes.  For example:

Side dishes

So the question is as the user is incrementing the values, where do we store this state?  The first thought is to just keep it in the UITableViewCell but this has major drawbacks, including:

  • the data is lost once the UITableViewCell is scrolled off screen, as it is re-used to display other dishes.
  • maintaining state in the view is just not clean design.  This is controller territory.

Protocols and Delegation

The sensible place to keep the data is in the controller.  Then the question becomes, “How do we call back to the controller from the UITableViewCell?”  

Using Protocols and Delegation, we can easily have the controller maintain the state.  Here’s I did this.

SideDishTableViewCell -> UITableViewCell

I subclassed the view cell with SideDishTableViewCell (SDTVC).  In SDTVC, I defined a protocol:

// SideDishTableViewCell.h

@protocol SideDishTableViewCellDelegate;
@interface SideDishTableViewCell : UITableViewCell

// define a @property to hold a reference to the delegate
@property (assign, nonatomic) id <SideDishTableViewCellDelegate> delegate;
@end

// define the @protocol here
@protocol SideDishTableViewCellDelegate <NSObject>
@optional
- (int)addItemWithCell:(SideDishTableViewCell *)cell;
- (int)removeItemWithCell:(SideDishTableViewCell *)cell;
@end

Now the SDTVC has a reference to a delegate which we’ll call whenever the user adds or removes items.  One note: I chose to pass the entire SDTVC because it contains bits of data that the controller needs. Another option is to just pass the dish’s ID and have the controller do a bit more work to get its metadata.

Calling the delegate from IBAction

Each of the + and – buttons are tied to IBActions, and the IBAction methods are where we call out to the delegate.

// SideDishTableViewCell.m

// The value 'q' is returned from the controller and is used to update the quantity displayed.  The View does no math.
- (IBAction)increaseQuantity:(id)sender {
    int q = [[self delegate] addItemWithCell:self];
    self.quantityLabel.text = [NSString stringWithFormat:@"%d", q];
}
- (IBAction)decreaseQuantity:(id)sender {
    int q = [[self delegate] removeItemWithCell:self];
    self.quantityLabel.text = [NSString stringWithFormat:@"%d", q];
}

Implementing the protocol from the View Controller

// SideDishViewController.h

#import "SideDishTableViewCell.h"
@interface SideDishViewController : UIViewController <SideDishTableViewCellDelegate>

And the implementation.

// SideDishViewController.m
-(int)addItemWithCell:(SideDishTableViewCell *)cell {
     // Update a collection that holds the dishes and their quantities

     // Return this side dish's quantity
}

Summary

There you have it.  We’ve kept the view very simple to the point it doesn’t even have to do any math.  It simply lets the controller handle the increment/decrement and then just waits for the controller to tell it what the new quantity is.


0

Welcome to the Inner Circle

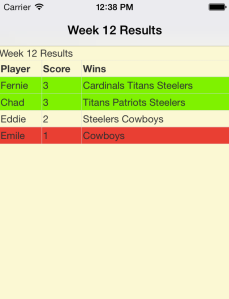
Inner Circle is a simple game of predicting outcomes of events and comparing yourself against your friends.  I’ve started learning iOS dev and I am building Inner Circle to help me hone my iOS skills.  I have recruited 3 additional players and we just wrapped up the first week.  All questions were NFL selections.  Results are in the pictures below.

I decided to build Inner Circle to give me an opportunity to practice across several areas of iOS development.  This includes:

  • Getting and posting JSON to a server
  • Customizing the Table View to make the question selection cells bow to my command 
  • Using a WebView to view content from the web (this is the tables view)
  • Saving data locally between app restarts (username)
  • App icons – just anything besides the default!
  • And to see if we can make this game fun enough for us to want to continue playing

I’ve also coddled together a simple node.js app to manage all the data.  Feels good to work with Coffeescript again.  So clean!  And Heroku and Mongolab again to the quick and dirty rescue.

And big kudos to Test Flight for making it simple to share builds with your users.  All for free.

Next on the product timeline:

  • Adding the notion of Quizzes, or a grouping of questions
  • This will allow you to work on multiple simultaneous sets of questions
  • Display a selection list of the current open Quizzes

Make your picks

Make your picks

The scores after the first week.

The scores after the first week.

0

Moving Hopscotch to v3.0

“…to market and promote,
and you better hope
(For what?)
that the product is dope.” – A Tribe Called Quest

What’s happening in Hopscotch 3.0

There comes a time in every product’s lifetime that it needs a major reworking.  Hopscotch.fm has been live for over a year now and I’m happy with where it’s gotten to.  After not working on it much since early 2013, I decided it’s time to give it some love.  I brainstormed what I want to change.  Here are the notes:

Brainstorming notes

Brainstorming notes

The main points I want to focus on in HS 3.0 are:

  • Decouple the music listening from the browsing.  Right now reading about a show auto-plays songs from that show.
  • Use a front end MVC framework.  Leaning strongly towards AngularJS.
  • Responsive UI – the site doesn’t look amazing on a mobile browser.  Good timing as Bootstrap 3 purports to be a mobile first framework now.  Nice.

The layout concept

Looking at the sketch in my notes above, here is the layout I am going to work with.  This screenshot was done using Bootstrap 3.

Overall layout

Overall layout

The layout in code

This is the Jade template using Bootstrap 3:

	
div.container.fullheight

	div.row(style="border:2px")
		div.col-md-8
			h3 Header toolbar
		div.col-md-2
			h3 Social
		div.col-md-2
			h3 City

	div#radio.row.show-grid
		div.col-md-8
			h3 Radio player
		div.col-md-4
			h3 (unused space)

	div#lower.row.show-grid.fullheight
		div#artist.col-md-8.fullheight
			h3 Artist Detail
		div#shows.col-md-4.fullheight
			h3 Upcoming shows

This is the CSS in addition to Bootstrap’s:

div {
	box-shadow: 2px 5px 5px #888888;
}

.fullheight {
	height: 100%;
}

html,body { 
	height:100%; 
}

What’s next

I still want to focus on layout and building the framework to start using AngularJS.  As more concrete objectives, these would be:

  • set up AngularJS.  Create Controller etc and have it load today’s list of shows automatically on page load.  Once this is working, it should be smooth(er) sailing to get fancy.
  • mobile responsive css.  Buzzwords.  Want to get the site looking GREAT on mobile browsers.  Eventually I’d like to get it playing as a continuous radio station on mobile, which I believe can be done with SoundCloud.
3

Using a single global DB connection in Node.js

“And I’m single, yeah, I’m single,
And I’m single, tonight I’m single,
And I ain’t tripping on nothing, I’m sipping on something,
And my homeboy say he got a bad girl for me tonight” – Lil Wayne

Since Javascript, and in turn Node.js, are single threaded, we can get by with just using one database connection throughout an entire application.  Pretty cool!  We no longer have to open/close/maintain connections and connection pools.  Let’s see how this could be done.

Think Globally, Code Locally

In pure Javascript, any variable you declare that is not defined within another scope (e.g. a function, within an object), will be added to the global scope.  However, because Node wraps each file into its own module with CommonJS, each module does not have direct access to the global scope.  But, Node provides a handy workaround:

global.db = ...

global.varName is accessible from any module.  Perfect.  So we can simply set a db connection on global.db and throw a reuse celebration party!  But before that party, let’s see how we would code this.

Global DB in Express with Mongoose
In this example we will create a single connection to Mongo using the Mongoose library.  In app.js, we define the global connection where we can use the local environment to determine the db uri. We will lazily create it so it will get created only when it is first requested.

// app.js
var express = require('express'); 
var app = express(); 
var mongoose = require('mongoose');

// Configuration 
app.configure('development', function(){ 
  app.set('dburi', 'localhost/mydevdb'); }); 

app.configure('production', function(){ 
  app.set('dburi', 'mongodb://somedb.mongolab.com:1234/myproddb'); }); 

global.db = (global.db ? global.db : mongoose.createConnection(app.settings.dburi));

Now let’s say in another file, we want to create a Mongoose schema for an Alien being.  We simply do it as such:

// otherfile.js
var alienSchema = new Schema({
  planet : { type: String }
});
var Alien = db.model('Alien', alienSchema);

What is happening here is that db.model is looking for db within the current module otherfile.js, not finding it, and then going up the chain till it gets to global.db.  Then boom!  We’ve got aliens.

Closing the connection

Since we want the connection open the entire lifespan of the application, we can simply allow it to terminate upon the application’s termination.  No cleanup needed.  (Caveat: if you know of an explicit way of doing this, perhaps to do some additional cleanup or logging, I’d love to hear about it).

0

Building a binary search tree in Javascript

“A tree’s a tree. How many more do you need to look at?” – Ronald Reagan

I am reading Secrets of the Javascript Ninja by John Resig and wanted to try out some of the more advanced Javascript concepts.  I also wanted to do something more than just a ‘hello world’ so I decided to build a binary search tree (bst).

Beauty and the BST

There are many articles out there on BST’s so I will skip going into that here.  What I am interested in building is a simple node ‘object’ in JS that can hold references to its left and right children.  To do this, I decided to use the JS prototype functionality.

// Name and value can be set at creation time so are passed into the constructor
function Node(name, value) {
     this.name = name;
     this.value = value;
}

Node.prototype.setLeft = function(left) {
     this.left = left;
}

Node.prototype.setRight = function(right) {
     this.right = right;
}

BST Insertion Logic

Next up is creating the logic that adds a new node to the right place in the BST.  We are not going to get into rebalancing so it is very possible that this tree is waaaay overweighted on one side.  We will live with that and maybe get to that in a future exercise.

// tree is the root node of the tree.  node is the new node to add
// If the new node is greater than tree, then we either add it as the right child if tree does not have a child, otherwise, we call insertNode again but this time passing in tree's right child as the tree parameter.  Similar logic is done if node is less than tree.

function insertNode(tree, node) {
    if (tree) {
        if (tree.value < node.value) {
            if (tree.right) {
                insertNode(tree.right, node);
            } else {
                tree.setRight(node);
            }
        } else {
            if (tree.left) {
                insertNode(tree.left, node);
            } else {
                tree.setLeft(node);
            }
        }
    } else {
        tree = node;
    }
    return tree;
}

Testing the BST Here we do some initial setup in setup, where we add several nodes in various ascending order. Then we print out the tree with printTreeAsc to verify we can walk the tree from lowest to highest, starting from root.

function setup() {
    nodeA = new Node('a', 5);
    nodeB = new Node('b', 12);
    nodeC = new Node('c', 10);
    nodeD = new Node('d', 15);
    nodeE = new Node('e', 20);
    nodeF = new Node('f', 25);
    nodeG = new Node('g', 8);
    nodeH = new Node('h', 3);

    var tree = insertNode(tree, nodeA);
    tree = insertNode(tree, nodeB);
    tree = insertNode(tree, nodeC);
    tree = insertNode(tree, nodeD);
    tree = insertNode(tree, nodeE);
    tree = insertNode(tree, nodeF);
    tree = insertNode(tree, nodeG);    
    tree = insertNode(tree, nodeH);    
}

function printTreeAsc(root) {
    var currNode = root;
    if(currNode.left) {
        printTreeAsc(currNode.left);
    }

    console.log(currNode.value);

    if(currNode.right) {
        printTreeAsc(currNode.right);
    }
}

Running setup() and then printTreeAsc(nodeA) yields:

3
5
8
10
12
15
20
25

It works!
Lastly, how tall is my BST?
BSTs are a fun way to work with algorithms and recursion, so I decided to write a method to calculate the height of the tree. Basically this will return the maximum number of steps from nodeA down to the lowest node. Perfect candidate for recursion!

function calcHeight(node) {
    if (node) {
        return 1 + Math.max(calcHeight(node.left), calcHeight(node.right));
    } else {
        return 0;
    }
}

Result: 5. Passing in nodeA, this gives a result of 5.

Summary
So we got to see the JS prototype feature in action when we build the tree, in insertNode. We also built a simple binary search tree and verified it works by iterating over it in ascending order. And last but not least, we wrote a simple recursive method to determine its height.

1

Using Node cronjobs to replace Heroku worker dynos

“Time keeps on slipping, slippin…into the future.”  – Steve Miller Band

Hopscotch.fm relies on data that is pulled in from several music related services.  I have created multiple tasks each of which can be run from the command line, like:

node run manualrun getShows sf

This will get the shows for San Francisco. On Heroku, I was using the Scheduler to automatically run this periodically. All good so far.

The Problem

The solution worked great up until I started needing several of these workers, to get shows, to get artist metadata, to get artist songs, cleanup, and more.  Easy enough I thought.  I just added more tasks to the Heroku Scheduler. Except there is a limit to the free tier on Heroku…

The Surprise (the Heroku bill!)

My Heroku bill was over $70!  How did this happen??  Turns out I had exceeded the free monthly hours with all the worker dynos I had been spinning up.  So I needed a solution quick.  I host hopscotch.fm on nodejitsu so I figured why not just use that.

The Solution (cron!)

Enter node-cron. If you’ve ever used Linux/UNIX cron jobs, it’s nearly identical.  The syntax for dates is the same.  All you need to do is specify the function to run.  Here is a cron job in file cronjobs.js that crunches radio stations for a city:

var cronJob = require('cron').CronJob;
var cruncher = require('./cruncher); // internal class that does the crunching
var jobMetroRadio = new cronJob('00 05 00 * * 1-7', (function() {
  console.log('Starting crunching shows.');
  return cruncher.crunchShows(function() {
    return console.log('Finished crunching shows.');
  });
}), (function() {}), true, time.tzset("America/Los_Angeles"));

Then in app.js I just:

require('./cronjobs');

And lastly add these two packages to package.json and install them

cron  // add to package.json
time  // add to package.json
npm install

The Result
I’ve moved all of the tasks over from Heroku Scheduler onto the nodejitsu deployment and everything is running smoothly. Hooray for cron!